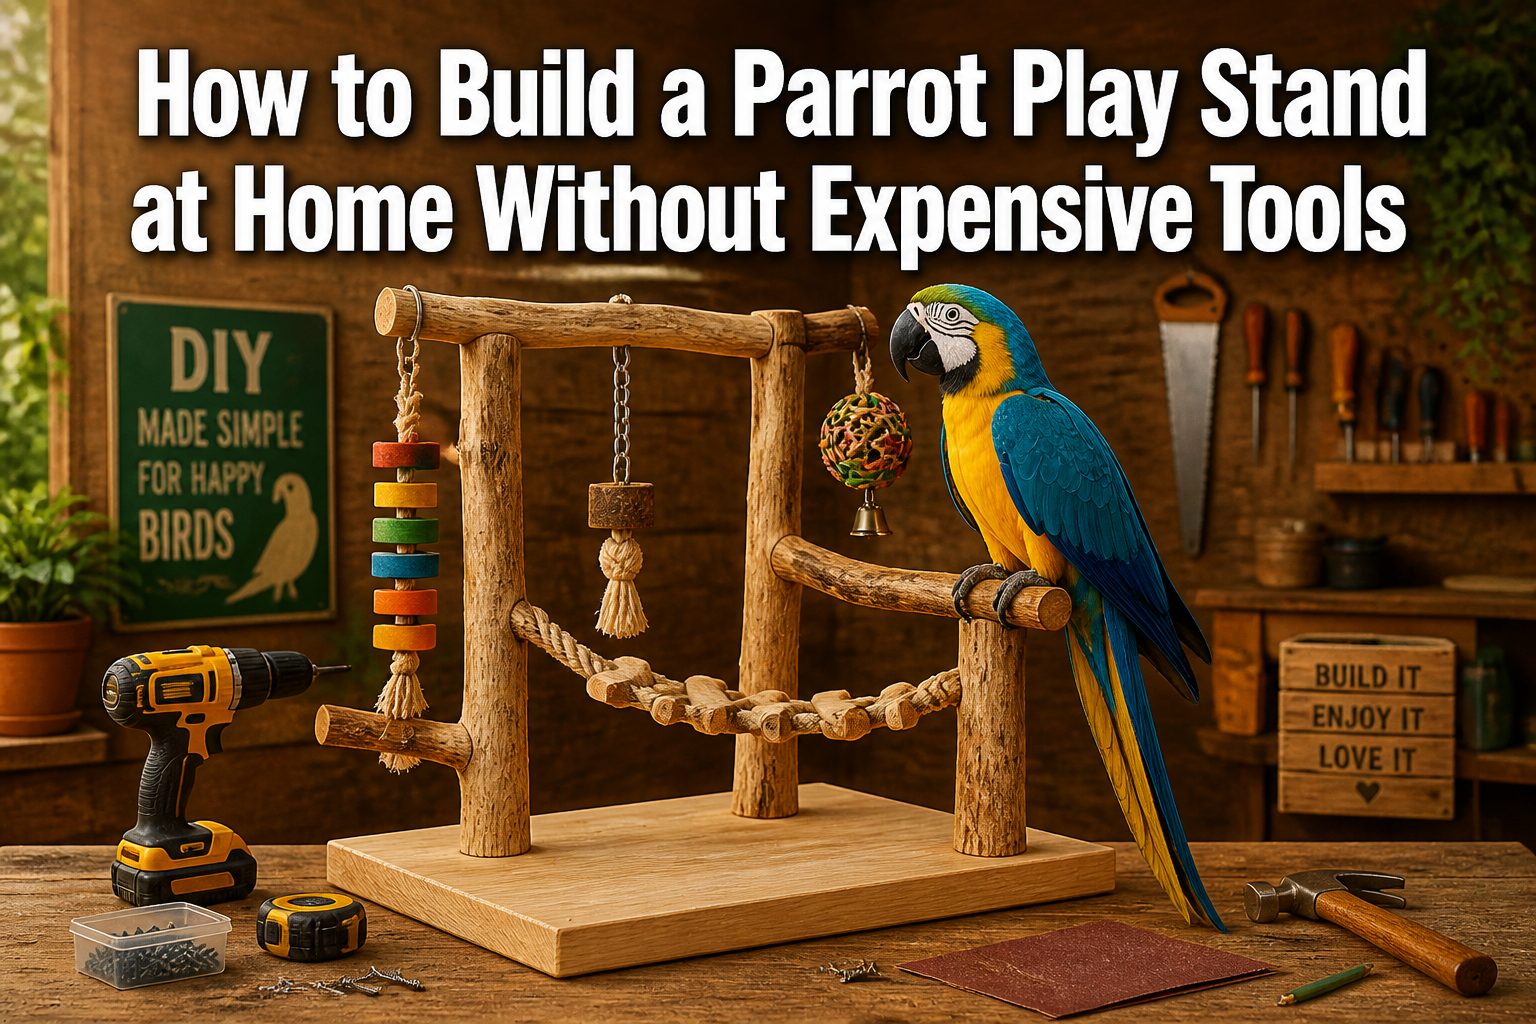
Building a parrot play stand at home requires only basic hand tools like a drill, saw, and sandpaper, plus untreated wood branches and hardware store supplies. Most DIY bird stands cost $30-50 in materials and take 3-4 hours to complete, compared to $150-300 for commercial versions.
What Materials Do You Need for a Parrot Play Stand at Home?
The essential materials for a homemade parrot play stand include a sturdy base, natural wood perches, stainless steel hardware, and bird-safe finishes. Most supplies come from hardware stores and cost significantly less than commercial alternatives.
Base Materials
- Wooden base: 18″ x 18″ x 1″ plywood or solid wood board.
- Center post: 2″ x 2″ untreated lumber, 3-4 feet tall.
- Stabilizing feet: Four rubber furniture pads or wooden blocks.
Perching Components
- Natural branches: 1-3 inches in diameter, various lengths.
- Dowel rods: ¾” to 1″ diameter hardwood (backup option).
- Rope perches: Natural cotton or sisal rope, ½” thick.
Hardware and Fasteners
- Wood screws: 2½” deck screws for base assembly.
- Eye hooks: Stainless steel, various sizes for toy attachment.
- Washers: Prevent wood splitting during assembly.
- Sandpaper: 120 and 220 grit for smooth finishing.
Choose materials based on your bird’s size: Larger parrots need thicker perches (2-3 inches) while smaller birds prefer ¾-1 inch diameters.
Which Tools Are Actually Required for Building at Home?

You only need five basic hand tools to build a functional parrot play stand: a drill, saw, sandpaper, measuring tape, and pencil. Power tools speed up the process but aren’t essential for a successful project.
Essential Hand Tools
- Cordless drill: For pilot holes and driving screws.
- Hand saw, or circular saw: Cutting lumber to size.
- Sandpaper or sanding block: Smoothing rough edges.
- Measuring tape: Ensuring proper proportions.
- Pencil: Marking cut lines and screw locations.
Optional but Helpful Tools
- Jigsaw: Creating curved cuts for decorative elements.
- Router: Rounding over sharp edges (sandpaper works too).
- Clamps: Holding pieces during assembly.
- Level: Ensuring the stand sits evenly.
Most homeowners already own these basic tools, making this project accessible without expensive equipment purchases. Borrow tools from neighbors or rent them for a day if needed.
Common mistake: Don’t skip the drill bit set. Use bits slightly smaller than your screw diameter to prevent wood splitting.
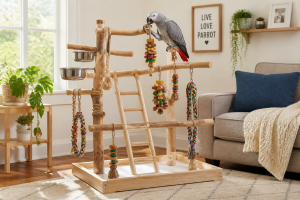
How Do You Design a Safe Parrot Play Stand at Home Layout?
A safe parrot play stand design features multiple perch levels, stable proportions, and easy cleaning access. The classic T-stand design works well for most bird sizes and skill levels.
Basic T-Stand Dimensions
- Base size: 18″ x 18″ minimum (larger for big birds).
- Height: 3-4 feet total (adjust for your bird’s comfort).
- Perch spacing: 12-18 inches between levels.
- Top perch: Extend 8-10 inches beyond the center post.
Safety Design Elements
- Rounded edges: Sand all corners smooth.
- Stable base: Wide enough to prevent tipping.
- Appropriate spacing: Prevent head or wing entrapment.
- Smooth transitions: No sharp angles or protruding hardware.
Customization Options
- Multiple perch angles: Create interesting climbing paths.
- Toy attachment points: Add eye hooks for enrichment items.
- Food station: Include a small platform for treats.
- Removable components: Make cleaning easier.
Design rule: The base width should be at least half the total height for stability. A 4-foot-tall stand needs an 18-24-inch base minimum.
What’s the Step-by-Step Building Process for Beginners?
Start with the base assembly, then add the center post, and finish with perch installation. This logical sequence prevents mistakes and ensures structural integrity throughout the build.
Phase 1: Base Preparation (30 minutes)
- Cut the base: Measure and cut your 18″ x 18″ baseboard.
- Mark the center: Find the exact center point for the post.
- Drill pilot hole: Use a bit slightly smaller than your screw diameter.
- Sand the base: Smooth all surfaces with 120-grit sandpaper.
Phase 2: Center Post Installation (45 minutes)
- Cut post to length: Measure desired height minus base thickness.
- Attach to base: Drive 2½” screws from underneath.
- Check alignment: Ensure the post stands perfectly vertical.
- Add stabilizing feet: Attach rubber pads to base corners.
Phase 3: Perch Installation (90 minutes)
- Select branch placement: Mark locations on the center post.
- Drill mounting holes: Create secure attachment points.
- Test fit branches: Ensure proper angles and spacing.
- Secure with screws: Use washers to prevent splitting.
- Final sanding: Smooth any rough spots with 220-grit paper.
Phase 4: Finishing Touches (45 minutes)
- Install eye hooks: Add toy attachment points.
- Safety inspection: Check for sharp edges or loose hardware.
- Clean thoroughly: Remove all dust and debris.
- Test stability: Ensure the stand won’t tip under use.
Pro tip: Dry-fit all components before final assembly. This prevents mistakes and allows adjustments without wasting materials.
How Do You Choose Bird-Safe Wood for Your Home Project?
Safe wood species for parrot play stands include apple, birch, willow, and manzanita, while cedar, oak, and treated lumber must be avoided. Always source branches from pesticide-free areas and properly prepare them before use.
Recommended Safe Woods
- Fruit woods: Apple, pear, cherry (remove bark first).
- Hardwoods: Birch, maple, ash, elm.
- Specialty options: Manzanita, willow, poplar.
- Commercial dowels: Untreated hardwood only.
Woods to Avoid Completely
- Toxic species: Cedar, redwood, oak, walnut.
- Treated lumber: Pressure-treated or stained wood.
- Unknown sources: Wood of uncertain species or treatment.
- Painted materials: Any previously painted surfaces.
Preparation Steps for Natural Branches
- Clean thoroughly: Scrub with plain water and a brush.
- Inspect for damage: Remove cracked or diseased sections.
- Bake for safety: A 200°F oven for 30 minutes kills parasites.
- Cool completely: Allow to reach room temperature.
- Sand if needed: Smooth any rough or splintered areas.
Safety rule: When in doubt, don’t use it. Stick to known safe species from reputable sources rather than risk your bird’s health.
What Are Common Mistakes When Building Parrot Play Stands at Home?
The most frequent errors include using toxic materials, creating unstable designs, and leaving sharp edges unfinished. These mistakes can harm your bird or create frustrating structural problems.
Material Selection Errors
- Wrong wood species: Using cedar or other toxic woods.
- Galvanized hardware: Zinc coating can poison birds.
- Inappropriate sizing: Perches are too thin or thick for your bird.
- Treated materials: Pressure-treated lumber contains harmful chemicals.
Design and Construction Issues
- Unstable base: Too narrow for the stand height.
- Poor spacing: Perches too close together or far apart.
- Sharp edges: Forgetting to sand corners and cut ends.
- Weak joints: Insufficient screws or pilot holes.
Safety Oversights
- Skipping inspection: Not checking for loose hardware regularly.
- Entrapment hazards: Gaps that could trap heads or feet.
- Rough surfaces: Leaving unsanded areas that could cause injury.
- Improper cleaning: Using harsh chemicals near the play area.
Prevention strategy: Take photos during assembly to document proper hardware placement. This helps during future maintenance and repairs.
How Much Does a DIY Parrot Play Stand Cost Compared to Store-Bought?
Building a parrot play stand at home typically costs $30-50 in materials, while comparable commercial stands range from $150-300. The savings increase dramatically for larger, more complex designs.
| Component | DIY Cost | Store-Bought Equivalent |
|---|---|---|
| Basic T-stand | $35-45 | $150-200 |
| Multi-level stand | $50-75 | $200-350 |
| Large parrot stand | $60-90 | $300-500 |
| Total Savings | 70-80% | Per project |
Cost Breakdown for Basic Stand
- Base materials: $15-20 (plywood and lumber).
- Hardware: $8-12 (screws, eye hooks, washers).
- Natural perches: $5-10 (branches or dowels).
- Finishing supplies: $3-8 (sandpaper, rubber feet).
Additional Value Factors
- Customization: Perfect fit for your bird and space.
- Quality control: You choose every material and joint.
- Skill building: Learn techniques for future projects.
- Satisfaction: Pride in creating something yourself.
Budget tip: Start with a simple design and add features over time. This spreads costs across multiple projects and lets you refine your skills gradually.
How Do You Maintain and Clean Your Homemade Play Stand?
Regular maintenance involves weekly cleaning, monthly hardware checks, and annual deep inspections. Proper care extends the stand’s life and keeps your bird safe from wear-related hazards.
Weekly Cleaning Routine
- Remove debris: Clear food scraps and droppings daily.
- Wipe surfaces: Use bird-safe cleaner on non-porous areas.
- Check stability: Ensure the stand doesn’t wobble.
- Inspect perches: Look for new cracks or rough spots.
Monthly Maintenance Tasks
- Tighten hardware: Check all screws and eye hooks.
- Sand rough spots: Address any splintering immediately.
- Replace worn items: Swap out damaged perches or toys.
- Deep clean: Scrub all surfaces thoroughly.
Annual Safety Inspection
- Structural integrity: Test all joints and connections.
- Wood condition: Look for rot, cracks, or insect damage.
- Hardware corrosion: Replace any rusted or damaged metal.
- Overall stability: Verify the base remains solid.
Cleaning tip: Use white vinegar and water (1:1 ratio) as a safe, effective cleaner. Avoid bleach or commercial cleaners near bird areas.
FAQ
How long does it take to build a parrot play stand at home?
A basic T-stand design takes 3-4 hours for beginners, including drying time. More complex multi-level stands may require 6-8 hours spread across multiple sessions.
Can I use branches from my backyard for the perches?
Only if you can positively identify the tree species as bird-safe and know the area is pesticide-free. Apple, birch, and willow are safe choices, but avoid oak, cedar, and cherry pits.
What’s the best height for a parrot play stand?
Most stands work well at 3-4 feet tall, putting the top perch at your bird’s eye level when you’re standing. Adjust based on your bird’s comfort and your room’s ceiling height.
Do I need special screws for bird safety?
Use stainless steel screws to prevent rust and zinc poisoning. Avoid galvanized hardware, which contains zinc that’s toxic to birds when ingested.
How often should I replace the wooden perches?
Replace perches when they become cracked, splintered, or worn smooth. Natural wood perches typically last 6-12 months with regular use, depending on your bird’s chewing habits.
Can small birds use the same stand design as large parrots?
The basic design works for all sizes, but adjust perch diameters and spacing. Small birds need ½-¾ inch perches, while large parrots prefer 2-3 inch diameters for proper foot exercise.
What’s the minimum base size for stability?
The base should be at least half as wide as the stand is tall. An 18″ x 18″ base works for stands up to 3 feet tall, while 4-foot stands need 24″ x 24″ bases minimum.
Is it safe to use power tools for this project?
Power tools are safe when used properly, but hand tools work just as well for this project. If you’re uncomfortable with power tools, stick to hand saws and manual sanders.
How do I know if my homemade stand is structurally sound?
Test by gently pushing the top perch in different directions. The stand should feel solid with minimal flex. Any wobbling or creaking indicates loose joints that need tightening.
Can I add a food bowl to my DIY play stand?
Yes, but use stainless steel bowls and position them where droppings won’t contaminate the food. Consider removable bowl holders for easier cleaning.
What should I do if my bird chews the wooden parts?
Some chewing is normal and healthy. Replace pieces when they become unsafe, and provide dedicated chew toys to redirect destructive behavior away from the stand structure.
How do I transport a homemade play stand?
Design removable perches if you plan to move the stand frequently. The base and center post should stay assembled, but perches can unscrew for easier transport.
Summary
Building a parrot play stand at home offers significant savings, complete customization, and the satisfaction of creating something perfect for your feathered friend. With basic hand tools and $30-50 in materials, you can construct a safe, durable stand that rivals commercial options costing $150-300.
The key to success lies in choosing bird-safe materials, following proper construction techniques, and maintaining the stand through regular inspections. Start with a simple T-stand design to build your confidence, then experiment with more complex features as your skills develop.